
Arduino has been around since 2005 and it is one of the most popular cheap DIY (Do it Yourself) board available in the market. It is a single board complex circuit which has a microcontroller, reset switch, USB port for PC interfacing (serial communication) and input/output ports etc. The board has an open source hardware board designed for 8 bit Atmel AVR microcontroller or 32 bit Atmel Arm. Now a day’s Arduino has USB interface having six analog input pins and 14 digital input/output pins; earlier it had VGA port for interfacing with a computer. We can attach other kits and shield such as Ethernet shield, starter kit. More details can be found here: Arduino Introduction
In this article, we will tell you how Arduino can be used to get temperature data from LM35 to show on your computer via a serial connection.
Things you will need:
- Arduino Board (any board will do the trick, but we recommend buying Mega2560 as we will be using this board for more projects) More details can be found here: Arduino Boards
- LM-35 temperature sensor. It is easily available and if you are reading this article we can assume you already have LM-35
- Breadboard or Veroboard
- connecting wires
- USB cable (comes with Arduino but you can buy too. The cable is called USB A to B)
Arduino is plug n play; you don’t need to put a microcontroller on breadboard adjust a crystal with it buy a separate hardware for PC serial port interfacing etc. You just connect it to a computer via USB cable install Arduino software (available here: Arduino Software) write a C code and burn it with the software and that’s it. You can blink LED’s, read Analog sensor values etc, even though Arduino software comes with lots of examples
Connection Diagram for LM-35 with Arduino Mega 2560
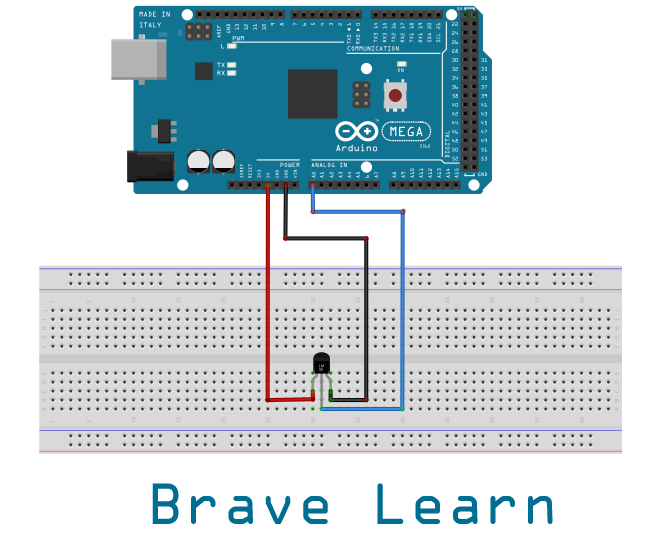
After connecting LM-35 with Arduino as shown above. Connect you Arduino with PC (make sure your software is installed) and upload the following code onto Arduino board.
Code:
/// Brave Learn ///
/// https://bravelearn.com ///
// Connect LM35 to Arduino as shown in the diagram

float reading; //declare variable in which temperature data is stored

void setup() {
  pinMode(A0, INPUT); // Tell Arduino to make its Analog A0 pin as Input reading pin
  // start the serial connection at 9600 bps:
   Serial.begin(9600);
}
void loop() { //Loops over
    //
    reading = (5.0 * analogRead(A0) * 100.0) / 1024; // Converts the analog voltage from sensor to digital reading where 5 is the supply voltage i.e. 5V
    // prints the data onto serial monitor
    Serial.print("Temperature is: "); //println prints next thing on a new line
    Serial.print((float)reading); // Prints current temperature on Monitor
    Serial.println(" *C");
    Serial.println("Visit: https://bravelearn.com ");
    Serial.println(" "); //Break space // Start reading on new line
    delay(10000); // 10 seconds delay before taking the new reading
}
Try this simple project and don’t forget to share your reviews in the comments below also share it with your friends. Well, this is a simple project we will show how can we use Ethernet shield with Arduino to read the temperature on the web, mobiles and we will also build WindowsPhone app for this purpose.